Note that you can double click any of the photos below and it will take you to the Roadside Guitars Flickr where you can see larger pictures.
What you need:
-Wire
-Solder
-Desoldering Braid
-Soldering Iron
-Needle Nose Pliers
-Heat Shrink Tubing
-SPST toggle switch (SPDT will both work fine, one contact will just be left unused.)
What you have to do:
Open up the pedal casing, remove knobs and nuts on pot shafts and flip circuit board over.
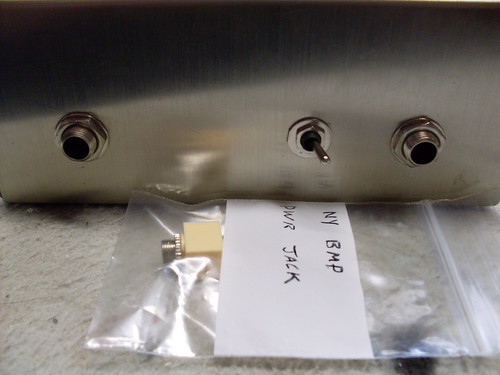
Either drill a hole for a switch somewhere or remove the 9V power adapter jack on the rear of the pedal (that's what I did so I wouldn't have to drill. The jack isn't worth much to me anyway since I generally prefer battery power. A sub-miniature, and possibly even a miniature switch will fit there perfectly). If you use the hole from the jack, just coil the wiring up, zip tie it or tape it, and tape around the jack itself just to make certain it doesn't short anything. I cut the jack out and tied the remaining wire off, because I can use the jack as a replacement part on other pedals.
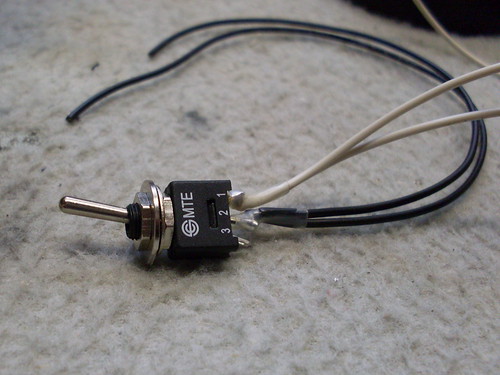
Wire Up the Switch: Solder two wires (I used 22 AWG stranded wire) to contact 1 and another two wires to contact 2. About 3 or 4 inches length is good. If you're using a sub-mini switch it's probably a good idea to heat shrink or tape the joints when you're done - they'll be very close together, possibly in danger of touching.
It should look something like this:
Once the switch is done you have to lift a couple of components: R5 and C8. They are both at the top of the board near the pots. They've been circled in this picture:
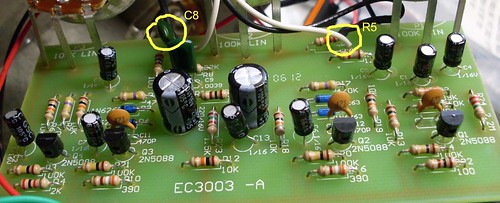
C8 is a little hard to see in the photo, but lift the leg on the far end of the board. R5's right leg should be lifted. Just heat up the joint on the bottom of the board and pull gently on the leg of the component with needle nose pliers from the other side to remove. Careful not to damage anything. After the parts are lifted, clean up the holes with desoldering braid.
Next: The leads from contact 1 of the switch need to be soldered into the holes from where the components were just lifted.
The leads from contact 2 go to the legs of the components themselves. I recommend using heat shrink on these joints.
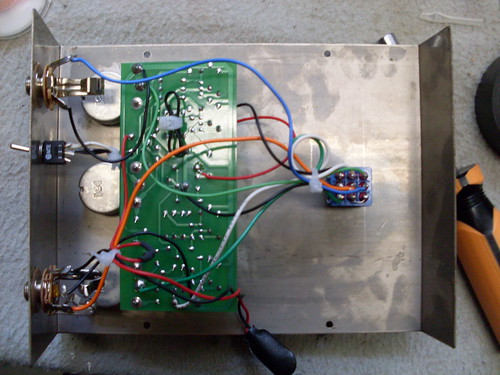
Install the switch in it's new home, plug in and check to make sure everything's working, and then re-install the pots, knobs, etc and enjoy! It should look something like this:
The bypassed setting, in addition to having some more midrange, gives a big volume boost, which I like. I highly recommend doing this to any Reissue NY Big Muff!

11 comments:
thankyou for this. I got stuck today doing the bypass mod thanks to a very widely distributed guide that was WRONG!
This one worked perfect, 1st time :)
Keep up the good work!
Help! I tried this and it didn't work so I tried to put it back to normal and now the pedal is REALLY quiet and I have to turn it all the way up and there's still no sound until I turn up the sustain. Even then, it's sooooo much quieter than the clean signal!!
Perhaps a dumb question but how do you remove the stupid power jack? It has a round ribbed nut instead of a traditional hex nut. Thx
I have a version 9 bmp (ex-3003 rev_E) I followed your directions and now I have a weird sounding POS. is the mod different for my version?
Just did this, what a difference, it really opens the pedal up, thanks for sharing!
Did you ever manage to fix your pedal after trying the mod? C8 is in a different place on the Rev E board
What version of board did you have?
for EC3003 Rev_E the correct resistor is R24 (not R5), C8 is the same.
For rev E which side of c8 and r24 do I need to remove, looking at it from the component side
Pliers
Post a Comment